Bouton on/off Raspberry Pi, Version µContrôleur
Par makoto doushite le dimanche, 23 septembre 2018, 22:22 - Raspberry Pi - Lien permanent
- Circuit et code modifié le 1er Décembre 2019, pour compatibilité avec le RPi Zero.
Comme je l'évoquais, je ne compte pas utiliser la version précédente du montage « power on/off » pour mon « Pi Hat », car le relais prendrait trop de place, j'ai donc travaillé sur cette nouvelle version à base d'un microcontrôleur Attiny85.
- Voici donc le schéma de ce nouveau montage :
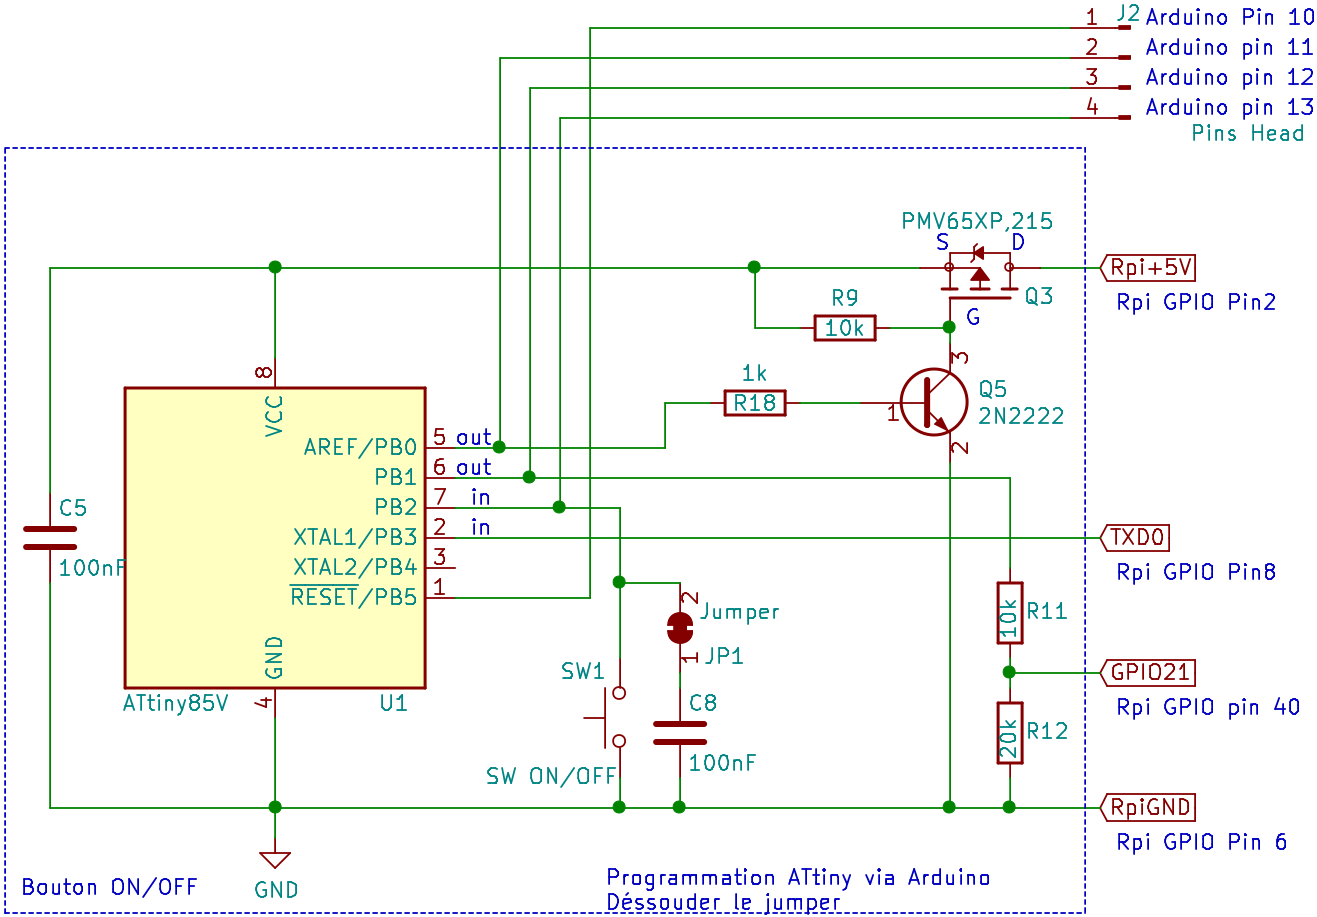
- Et il faut s'assurer que le port série (TXD0, RXD0) soit bien actif, soit via « sudo raspi-config » ou en passant à 1 la ligne « enable_uart » du fichier « /boot/config.txt ».
- Fonctionnement :
- Pour mettre en route le RPi, effectuer une pression sur SW1, la sortie PB0 de l'ATtiny85 est alors mise à l'état haut pour permettre, via le transistor 2N2222 qui envoie un état bas au transistor MOSFET, de faire passer le 5V au RPi.
Ici, comme pour le montage précédent, le signal TXD0 est exploité pour connaître l'état du RPi au moment où le bouton est pressé (état bas, car RPi éteint) .
- Pour éteindre le RPi, presser normalement le bouton SW1, ce qui enverra le signal à la sortie PB1 de passer brièvement à l'état haut, pour déclencher un arrêt propre de GNU/Linux via le GPIO21 du RPi, grâce au script Python3 ci-dessous.
Le pont diviseur que forment R11 et R12 permet de ne n'envoyer que 3,2V au GPIO, car rappelez-vous bien que le RPi fonctionne en 3,3V !!
- Une fois arrêté de cette manière, le signal TXD0 passe donc à l'état bas, l'état du GPIO ayant été mémorisé, un délai est octroyé pour couper l'énergie et donc 3 secondes après la dernière activité de la led verte du RPi, la sortie PB0 passe à l'état bas, le transistor MOSFET ne laisse plus passer le 5V au RPi.
- Presser le bouton SW1 plus de 3 secondes et le courant sera coupé brutalement, utile en cas de plantage du RPi
- Ce montage gère le reboot. Par contre si on utilise un sudo poweroff sur le RPi, le courant ne sera pas coupé automatiquement comme avec le relay du montage précédent. Il faudra alors presser SW1 plus de 3 secondes.
- Prérequis :
sudo apt-get install python3-rpi.gpio
- Écrire le script :
nano /home/pi/SoftOffButton.py
Avec dedans :
import RPi.GPIO as GPIO
import time
import os
import signal

print ("Soft Off Button")

GPIO.setmode(GPIO.BCM)
GPIO.setup(21, GPIO.IN, pull_up_down = GPIO.PUD_DOWN)

def button_pressed(channel):
    print ("Boutton Off pressé")
    os.system("sudo poweroff")

GPIO.add_event_detect(21, GPIO.RISING, callback=button_pressed)

signal.pause()
Pour démarrer automatiquement le programme python dés le démarrage du Raspberry, il faut créer un service :
sudo nano /etc/systemd/system/SoftOffButton.service
Avec dedans :
[Unit]
Description=Démarre le script SoftOffButton
[Service]
ExecStart=/usr/bin/python3 /home/pi/SoftOffButton.py
[Install]
WantedBy=multi-user.target
Installer le service au démarrage :
sudo systemctl --system daemon-reload
sudo systemctl enable SoftOffButton.service
Pour manipuler le service :
sudo systemctl status SoftOffButton.service
sudo systemctl start SoftOffButton.service
- Quelques composants sont au format CMS pour le montage sur plaquette labo, car ils serviront au « Pi Hat » que je réaliserais.

L'ATiny85 et le MOSFET sont câblés sur des pin header avec du fil émaillé RoadRunner super pratique, conseillé par Sacha !
- Programme ATtiny85 :
Voici le programme à coller dans le µContrôleur, j'ai utilisé la méthode décrite par Héliox pour le programmer via un ArduinoUNO :
#define relaisMOSFET 0            //PB0, pin5
#define Bouton 2                  //PB2, pin7
#define TXD0 3                    //PB3, pin2
#define BoutonGPIO21 1            //PB1, pin6
#define STATE_NORMAL 0            // no button activity
#define STATE_SHORT 1             // short button press
#define STATE_LONG 2              // long button press
volatile int  resultButton = 0;   // global value set by checkButton()
int EtatTXD0;
int EtatBouton;
int var = 0;

void setup() {
  attachInterrupt(0, checkButton, CHANGE);
  pinMode(Bouton, INPUT_PULLUP);
//  pinMode(Bouton, INPUT);
  pinMode(TXD0, INPUT);
  pinMode(BoutonGPIO21, OUTPUT);
  pinMode(relaisMOSFET, OUTPUT);
  digitalWrite(relaisMOSFET, HIGH); // power off obligé sinon ensuite le transistor refuse de commuter
}

/*****************************************************************/
void checkButton() {                                    // appelée par interruption à l'appuie sur le bouton
  /*
  * This function implements a short press and a long press and identifies between
  * the two states. Your sketch can continue processing while the button
  * function is driven by pin changes.
  * https://www.electro-tech-online.com/threads/dual-state-pushbutton-debounced-using-interrupts-for-arduino.147069/
  * Modifié par MakotoWorkshop
  */
  const unsigned long LONG_DELTA = 3000ul;              // hold seconds for a long press
  const unsigned long SHORT_DELTA = 0ul;                // hold seconds for a long press

  static int lastButtonStatus = HIGH;                   // HIGH indicates the button is NOT pressed
  int buttonStatus;                                     // button atate Pressed/LOW; Open/HIGH
  static unsigned long longTime = 0ul, shortTime = 0ul; // future times to determine is button has been pressed a short or long time
  boolean Released = true, Transition = false;          // various button states
  boolean timeoutShort = false, timeoutLong = false;    // flags for the state of the presses

  buttonStatus = digitalRead(Bouton);                   // read the button state on the pin "Bouton"
  timeoutShort = (millis() > shortTime);                // calculate the current time states for the button presses
  timeoutLong = (millis() > longTime);

  if (buttonStatus != lastButtonStatus) {               // reset the timeouts if the button state changed
      shortTime = millis() + SHORT_DELTA;
      longTime = millis() + LONG_DELTA;
  }

  Transition = (buttonStatus != lastButtonStatus);      // has the button changed state
  Released = (Transition && (buttonStatus == HIGH));    // for input pullup circuit

  lastButtonStatus = buttonStatus;                      // save the button status

  if ( ! Transition) {                                  //without a transition, there's no change in input
                                                        // if there has not been a transition, don't change the previous result
       resultButton =  STATE_NORMAL | resultButton;
       return;
  }

  if (timeoutLong && Released) {                        // long timeout has occurred and the button was just released
       resultButton = STATE_LONG | resultButton;        // ensure the button result reflects a long press
  } else if (timeoutShort && Released) {                // short timeout has occurred (and not long timeout) and button was just released
      resultButton = STATE_SHORT | resultButton;        // ensure the button result reflects a short press
  } else {                                              // else there is no change in status, return the normal state
      resultButton = STATE_NORMAL | resultButton;       // with no change in status, ensure no change in button status
  }
}
/*****************************************************************/

void loop() {
  SoftPowerONOFF();
  HardPowerOFF();   // Coupe l'alim brutalement
  delay(170);       // wait for a second
}

/*****************************************************************/
void SoftPowerONOFF() {
  EtatTXD0 = digitalRead(TXD0);

  if ((EtatTXD0 == LOW) && (resultButton == STATE_SHORT)) //POWER ON via bouton
  {
    digitalWrite(relaisMOSFET, HIGH);                      // power on    //PB0, pin5
    resultButton=STATE_NORMAL;
  }

  else if ((EtatTXD0 == HIGH) && (resultButton == STATE_SHORT))   //SOFT POWER OFF via bouton, étape1/2
  {
    digitalWrite(BoutonGPIO21, HIGH);                             // 3,2V envoyé au Rpi -> appel du Script Rpi Shutdown
    delay(300);
    digitalWrite(BoutonGPIO21, LOW);                              // 0V
    var = 1;
    resultButton=STATE_NORMAL;
  }

  else if ((EtatTXD0 == LOW) && (var == 1))   //SOFT POWER OFF via bouton, étape2/2
  {
    delay(7000);                             // délai pour couper l'énergie, 3 sec après la dernière activité led verte du Rpi
    digitalWrite(relaisMOSFET, LOW);        //power off
    var = 0;
  }
}

/*****************************************************************/
void HardPowerOFF() {
  if ((resultButton == STATE_LONG))     // appuie long sur le bouton (3 sec)
  {
    digitalWrite(relaisMOSFET, LOW);  //power off
    resultButton=STATE_NORMAL;
  }
}








Commentaires
Salut,
Juste un petit commentaire, au lieu d'utilise un Attiny qui est un peu overkill pour faire de la gestion on/off tu pourrais regarder du coté de puce qui sont dediés a ca. Comme par exemple ca:
http://www.analog.com/media/en/tech...
A+
Je connaissais pas ^^;
Merci !